DSP MATLAB Project Report
Image Processing With GPU
2020 년 12 월 18 일
I. Project 개요
1.1 Project 개발 필요성
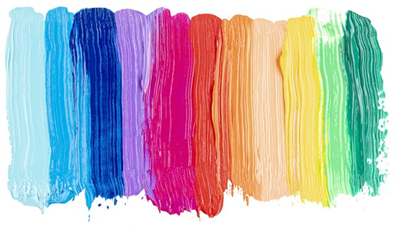
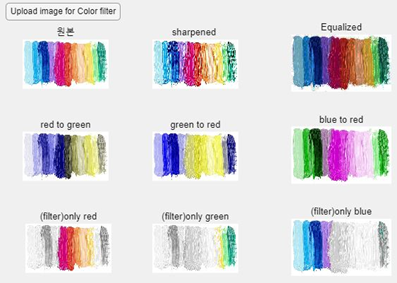
요즘 기본적으로 스마트폰을 사용하면서 카메라의 성능 및 스마트폰 자체적인 성능이 발전하여 자체적으로도 아래 사진과 같은 여러가지 필터를 줄 수 있게 되었다.
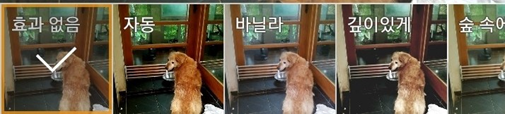
여러 수식을 이용하여 이미지를 이루고 있는 픽셀 행렬을 다른 값으로 바꾸어 이미지를 변형하는 것. 이것이 이미지 필터링의 정의이다.
이러한 이미지 필터링은 강의 시간에도 연습해 보았지만 주로 cpu를 사용하는것이었고, 이를 gpu를 주체로 사용하여 필터링하고, 다른 방법으로도 사진 파일에 대해 필터링을 하는 프로젝트를 하면 흥미로울 것이라 생각하여 시작하게 되었다.
1.2 Project 개발 배경 및 동향
처음 계획을 세우고 공부를 해보니 Mathworks에 위치한 예제들에서 큰 차이를 느끼지 못하였고 단순히 코드를 몇글자 수정하고 필터링 된 결과물들을 나열하는 것에서는 예제의 복사 붙여넣기가 된다고 판단하였다. 이를 해결하기 위해 자체적으로 색에 대해 필터링이 가능한 필터링 함수를 제작하고, UI를 변경하여 단순하게 정해진 사진의 나열이 아니라 사용자가 직접 원하는 사진 파일을 선택하여 필터링하도록 목표를 잡았다.이번학기 딥러닝 수업을 들으면서 이미지 분류 모델을 직접 만들어보았다. 따라서 이미지 품질향상에도 딥러닝을 적용한다면 기존 필터링보다 좋은 결과를 보여줄 것이라 생각하여 딥러닝 모델을 활용하여 이미지 품질 향상을 해보고자 하였다.gpu와 딥러닝을 사용하여 이미지 필터링을 하는 것으로 세부적인 내부 프로세스를 변경하게 되었다.
1.3 기본적인 동작 및 기능
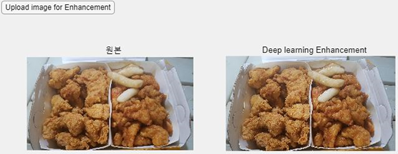
필터링을 하고자 하는 이미지를 준비하고, 각각 원하는 필터링 방법에 대한 버튼을 눌러 이미지 파일을 입력받는다. 입력받은 이미지 파일을 MATLAB의 예제에 사용된 sharpened나 equalized 필터링 처리하거나 RGB중 원하는 색상만을 표시해주는 필터링을 해주거나 gaussian 필터링 혹은 딥러닝 모듈을 이용한 필터링을 해주도록 만들었다.원본 이미지 파일과의 비교를 위해 원본 파일을 출력하면서 동시에 필터링 된 이미지 파일을 볼 수 있도록 구현하였다.
1.4 Project 개발 방법
참고자료로는 MathWorks 페이지의 필터링 기능을 하는 함수와 휘도 색차 구현 함수, 딥러닝 모델을 검색해 사용하였다.
현재 프로젝트는 gpu를 사용한 필터링인데 gpu를 사용하려면 CUDA api 모델이 필요하므로 amd 프로세서를 사용하는 팀원의 컴퓨터에서 호환되지 않는 문제가 발생하므로 호환성 문제를 개선해야 하며, 기여도에 있어서는 기존 함수를 찾아 직접 구현한 것이 대부분이지만, UI 제작과 HSV를 이용한 컬러 필터링 함수를 독자적으로 제작하였으며 딥러닝 모델을 사용하여 휘도값을 바탕으로 해상도를 높이려하였기 때문에 기여도는 50%라고 생각된다. 직접 딥러닝 모델을 개발하고자 하였으나, 데이터셋을 구하기 힘들고 컴퓨팅 성능이 부족하여 좋은 성능을 내기에 어려웠다. 따라서 미리 학습된 VDSR 신경망을 가져와 사용하였다.
II. Project 수행 내용
2.1 알고리즘
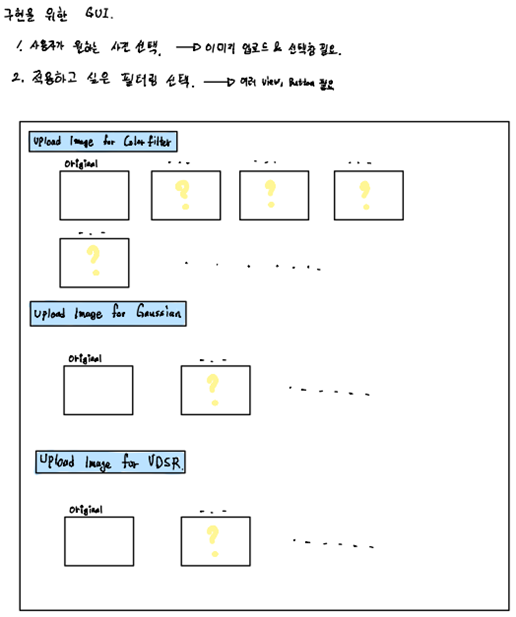
만들고자 하는 프로젝트의 단순한 알고리즘은 다음과 같다.
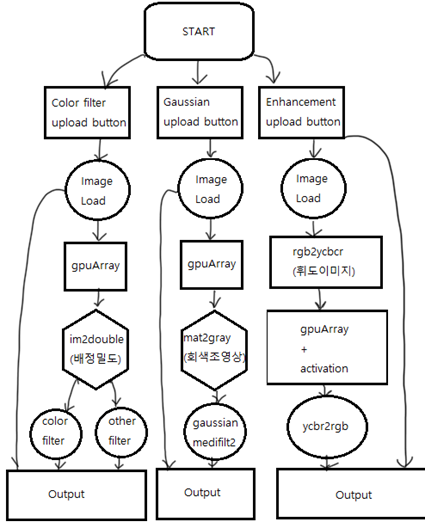
기능을 크게 3가지로 나누고 각 버튼을 통해 해당 기능에 적용할 이미지를 선택하도록 한뒤,
이미지를 로드하여 gpuArray를 통해 이미지를 처리(Color 관련 filtering, Gaussian/adjust, 딥러닝)하게 된다.
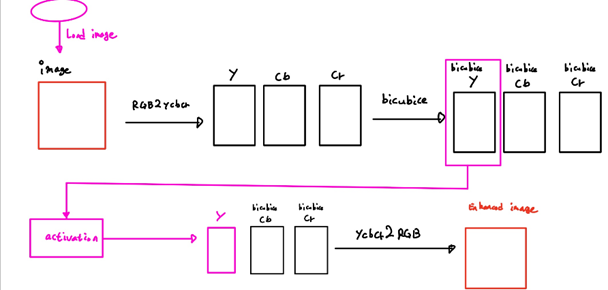
딥러닝을 이용한 이미지 품질향상은 직접 모델을 개발하기엔 컴퓨팅자원과 시간이 부족하여 기존에 학습된 VDSR모델을 사용하였다. VDSR모델은 Accurate Image Super Resolution Using Very Deep Convolutional의 약자로 저해상도의 이미지와 고해상도의 이미지 사이의 매핑을 학습하여 저해상도의 이미지를 고해상도로 upscale시켜준다.
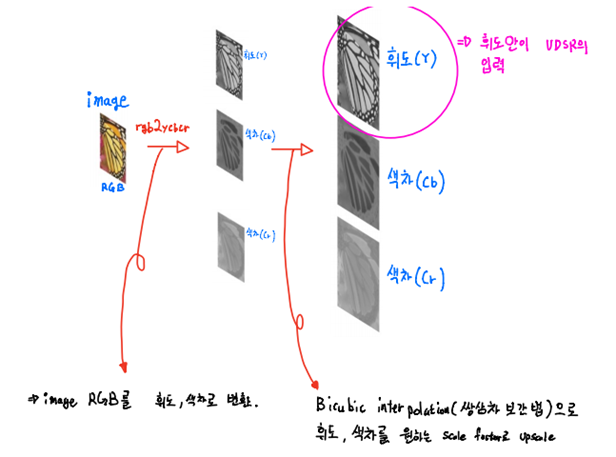
먼저 RGB의 이미지에서 휘도와 색차로 이미지를 나누고 그 중 휘도 이미지를 사용하여 학습을 한다.
여기서 rgb2ycbcr을 하여 RGB이미지를 휘도, 색차로 구분한 뒤 바로 휘도를 사용하지 않고 좀더 부드럽게 하기위해 쌈삼차보간법을 적용한 휘도를 모델의 입력값으로 사용한다.
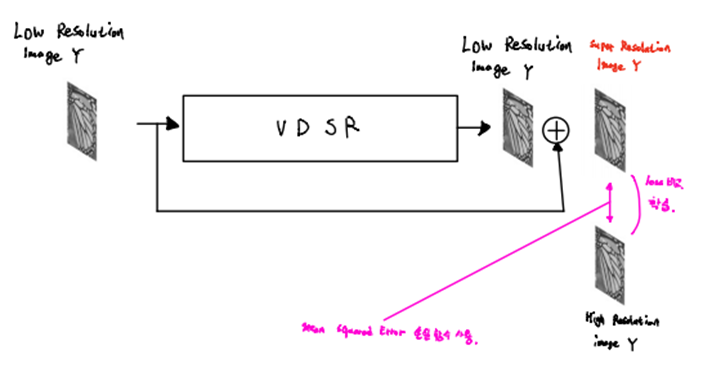
쌍삼차보간법이 적용된 휘도이미지는 VDSR 네트워크를 통과한 뒤 쌍삼차보간법이 적용된 휘도이미지와 더해져 Super Resoluion 이미지를 생성한다. 생성된 이미지는 High Resolution 이미지와 Mean Squad Error 손실함수를 사용하여 loss를 비교하고 loss를 줄여나가도록 학습된다.
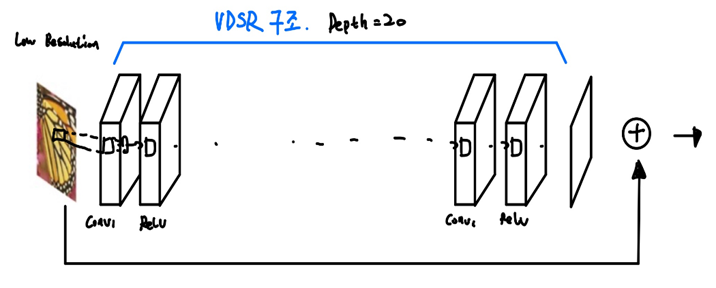
총 20개의 layer(image input layer +Convolution2D(padding 함), ReLU +regression layer)로 구성이 된다. 그리고 각 Convolution2D layer는 3x3x64 필터를 64개 포함한다.
이미지 향상 딥러닝 모델을 구현하기엔 데이터 셋과 컴퓨팅 자원, 시간이 부족하였으므로 위와 같은 구조로 학습된 batchsize=64, epoch이 100인 “trainedVDSR-Epoch-100-ScaleFactors-234.mat” 모델을 가져와 사용하였다. (위 모델의 경우 학습시간이 Nvidia사의 Titan X로도 6시간이 걸린다.)
원하는 이미지를 불러와 imread로 읽은 후, rgb2ycbcr을 거쳐 bicubic시킨 y 이미지를 가져와 학습하고 ycbcr2rgb를 하여 향상된 이미지를 얻는다.
참고)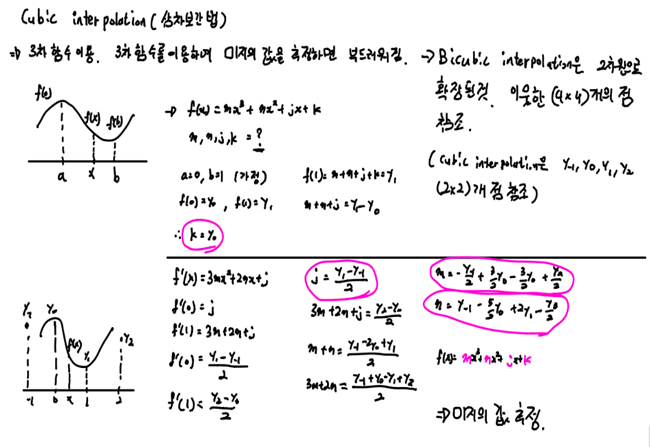 *휘도 = R, G ,B 픽셀 값의 일차 결합을 통해 각 픽셀의 밝기를 나타냄 *색차 = R, G, B 픽셀 값의 다른 일차 결합을 통해 색차 정보를 나타냄 *삼차보간법 삼차보간법은 3차함수를 이용하여 미지의 값을 추정하는 것이다. 삼차함수를 사용하기 때문에 더 부드러워진다. 미지의 값을 찾기 위해 위와 같은 식을 통하여 미지의 값을 추정한다. 쌍삼차보간법은 삼차보간법을 2차원으로 확장한 것인데, 삼차보간법에선 y-1 ,y0, , y1 , y2 이웃한 4개의 점을 참조하지만 쌍삼차보간법은 이웃한 16개의 점을 참조한다. |
2.2 MATLAB 구현
우선적으로 app designer를 사용하여 색상 추출을 위한 컬러 필터 함수를 추가하였다.
이미지를 인수로 받아 HSV로 변환하고 계산(mask create)를 통해 분리한 뒤 다시 RGB로 변환시켜
원하는 색조를 추출하는 필터함수이다.
| function I = colorfilter(app, image, range) % RGB to HSV conversion I = rgb2hsv(image); % Normalization range between 0 and 1 range = range./360; % Mask creation if(size(range,1) > 1), error('Error. Range matriz has too many rows.'); end if(size(range,2) > 2), error('Error. Range matriz has too many columns.'); end if(range(1) > range(2)) % Red hue case mask = (I(:,:,1)>range(1) & (I(:,:,1)<=1)) + (I(:,:,1)<range(2) & (I(:,:,1)>=0)); else % Regular case mask = (I(:,:,1)>range(1)) & (I(:,:,1)<range(2)); end % Saturation is modified according to the mask I(:,:,2) = mask .* I(:,:,2); % HSV to RGB conversion I = hsv2rgb(I); end end |
인자로 받는 범위의 경우 직접 색조를 찾아보면서 정확한 값을 찾아낼 수 있었고, 우리가 판단한 결과 빨간색의 범위는 320~50, 파란색 170~305, 초록색 50~170으로 대부분의 사진에서 색조를 구별하는데 성공하였다.

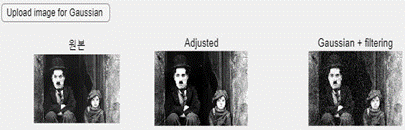
이미지의 회색조 영상처리를 한 후 Gaussian 필터링과 medifilter를 사용하여 원본과 adjust, gaussian을 출력하도록 구현하였다.
| %image enhancement Model Load% load('trainedVDSR-Epoch-100-ScaleFactors-234.mat'); dimage = original; dimage = im2double(dimage); [rows,cols,np] = size(dimage); %RGB이미지 색체, 휘도 분리 ycbcr_image = rgb2ycbcr(dimage); y = ycbcr_image(:,:,1);% 휘도 cb = ycbcr_image(:,:,2);% 색채 cr = ycbcr_image(:,:,3);% 색채 %삼차보간법을 거친 휘도,색채 bicubiced_y = imresize(y,[rows cols],'bicubic'); % bicubiced 휘도 bicubiced_cb = imresize(cb,[rows cols],'bicubic'); % bicubiced 색채 bicubiced_cr = imresize(cr,[rows cols],'bicubic'); % bicubiced 색채 %휘도 이미지로 학습된 딥러닝 알고리즘 dimage = activations(net,bicubiced_y,41); dimage = double(dimage); %이미지를 다시 RGB이미지로 Super_Resolution = bicubiced_y + dimage; vdsr_image = ycbcr2rgb(cat(3,Super_Resolution,bicubiced_cb,bicubiced_cr)); |
미리 학습된 100 epoch을 거친 VDSR모델을 사용하여 이미지 해상도를 높였다. 원하는 이미지를 불러와 imread로 읽은 후, rgb2ycbcr을 거쳐 bicubic시킨 y 이미지를 가져와 모델에 넣고 ycbcr2rgb를 하여 향상된 이미지를 얻는다.
2.3 입력 및 출력
| 입력 / 출력 | |
  |
|
  |
|
  |
|
III. 참여 인원별 역할 및 수행 소감
[정원영] -보고서 작성, GUI 구현, 컬러필터링 함수 구현
강의시간에 배운 바를 바탕으로 필터링하는데는 문제가 없었지만 정작 하고나니 양도 없고 배워가는 것도 없는것 같아 직접 HSV를 이용한 필터링 함수를 만들어 보았고, 색채같은 부분에 있어어서 많은 애를 먹었다. 하지만 원뿔형 구조에 대한 이해와 많은 시행착오를 겪은 후 약간이나마 이해를 할 수 있었고 사용자가 원하는 색채만을 추출한 이미지 필터링을 구현하는데 성공하였다.
또한 다른 팀원의 버튼을 구성할 수 있다는 제시를 통해 당시까지 구현한 필터링을 버튼 이벤트와 연동할 수 있었으며 결과적으로는 상당히 깔끔한 바탕의 GUI를 갖춘 프로젝트를 만들 수 있었다.
비대면이기에 많은 난항도 겪었지만 이번 프로젝트를 통해 진행에 대한 노하우를 얻었기 때문에 만족스러웠다.
[이창민] -보고서 작성, GUI구현, VDSR모델을 이용한 이미지 품질 향상 코드 수정
매트랩 수업과 딥러닝 수업에서 배운 내용을 결합하여 과제를 해보게 되어 매트랩이 여러 분야와 융합되어 다양하게 사용할 수 있음을 깨달았다. 수업시간에 배운 여러 노이즈제거 방법들도 딥러닝 분야와 합쳐 적용된다면 기존 dsp에서 쉽게 향상될 것이라고 느꼈다. 하지만 직접 모델을 개발할 환경이 되지 않아 epoch과 batchsize등을 늘리는 등 직접 모델을 개발, 수정해보지 못해 아쉬웟다. 완성도를 위해 GUI를 처음 만들어보니 시행착오도 많고 어려움도 많이 겪었지만 이때까지 GUI관련 프로그래밍은 거의 해보질 않아 좋은 경험이었다.
IV. Project 후기
매트랩을 처음하면서 완성도를 위해 GUI를 구현하는데 있어 시행착오가 많았다. 버튼 이벤트 처리 과정에서 에러가 많이 났으며, 이미지 불러오기 처리 과정에서 CUDA를 지원하지 않는 그래픽카드여서 gpuArray를 사용하는데 에러가 많았다. CUDA만을 지원하여 다른 intel, AMD 계열의 openCL을 지원하는 함수가 있었다면 범용적으로 사용 할 수 있어 좋았을 것이다.하지만 이번학기 딥러닝 과목을 들으면서 배운 내용을 토대로 다른 과제를 수행해 볼 수 있어서 좋았다. 아쉬운 점은 충분한 데이터 셋을 구할 수 있었다면 기존 모델에서 epoch을 늘리던가 batchsize를 늘려 좀더 좋은 결과 가진 모델을 사용할 수 있었을 것이며, 보고서의 제한 페이지가 존재하여 알고리즘에 대한 설명과 코드에 대한 팀의 이해도를 제대로 서술되지 못한 것 같아 아쉬움이 남는다.
이번 프로젝트를 통해 MATLAB이 강력한 언어임을 느꼈고, 이를 제대로 사용하기 위해서는 실 사용자인 우리가 익숙해져야한다는 점을을 느꼈다. 다른 프로젝트를 수행한다면 이번의 경험을 발판삼아 잘 진행할 수 있을 것으로 예상된다.
V. Appendix
| classdef app3_exported < matlab.apps.AppBase % Properties that correspond to app components properties (Access = public) UIFigure matlab.ui.Figure UploadimageforColorfilterButton matlab.ui.control.Button UploadimageforGaussianButton matlab.ui.control.Button UploadimageforEnhancementButton matlab.ui.control.Button Label matlab.ui.control.Label UIAxes1_1 matlab.ui.control.UIAxes UIAxes1_2 matlab.ui.control.UIAxes UIAxes1_3 matlab.ui.control.UIAxes UIAxes1_4 matlab.ui.control.UIAxes UIAxes1_5 matlab.ui.control.UIAxes UIAxes1_6 matlab.ui.control.UIAxes UIAxes1_7 matlab.ui.control.UIAxes UIAxes1_8 matlab.ui.control.UIAxes UIAxes1_9 matlab.ui.control.UIAxes UIAxes2_1 matlab.ui.control.UIAxes UIAxes2_2 matlab.ui.control.UIAxes UIAxes2_3 matlab.ui.control.UIAxes UIAxes3_1 matlab.ui.control.UIAxes UIAxes3_2 matlab.ui.control.UIAxes end methods (Access = private) % ----------------------------------------------------------------------- % % C O L O R F I L T E R % % -------------------------------------------------------------% % 빨강 범위: 320~50(hsv양 끝)% % 파랑 범위: 170~305 % % 초록 범위: 050~170 % function I = colorfilter(app, image, range) % RGB to HSV conversion I = rgb2hsv(image); % Normalization range between 0 and 1 range = range./360; % Mask creation if(size(range,1) > 1), error('Error. Range matriz has too many rows.'); end if(size(range,2) > 2), error('Error. Range matriz has too many columns.'); end if(range(1) > range(2)) % Red hue case mask = (I(:,:,1)>range(1) & (I(:,:,1)<=1)) + (I(:,:,1)<range(2) & (I(:,:,1)>=0)); else % Regular case mask = (I(:,:,1)>range(1)) & (I(:,:,1)<range(2)); end % Saturation is modified according to the mask I(:,:,2) = mask .* I(:,:,2); % HSV to RGB conversion I = hsv2rgb(I); end end % Callbacks that handle component events methods (Access = private) % Button pushed function: UploadimageforColorfilterButton function UploadimageforColorfilterButtonPushed(app, event) global filename; global filepath; [filename, filepath] = uigetfile({'*.png; *.bmp; *.jpg','supported imgaes';... '*.png', 'Portable Network Graphics(*.png)';... '*.bmp', 'Bitmap (*.bmp)';... '*.jpg', 'JPEG(*.jpg)';... '*.*','All files(*.*)'}, filepath); % Diverse Gpu image filtering by ÀÌâ¹Î, Á¤¿ø¿µ for matlab project% % Use gpu % image = gpuArray(imread([filepath, filename])); dimage = im2double(image); % Sharpened + Equalize % gradient = convn(dimage,ones(3)./9,'same') - convn(dimage,ones(5)./25,'same'); amount = 5; sharpened = dimage + amount.*gradient; equalized = histeq(dimage); % no (R/G/B) series % redChannel = dimage(:, :, 1); greenChannel = dimage(:, :, 2); blueChannel = dimage(:, :, 3); nored = cat(3, greenChannel, greenChannel, blueChannel); % cover from here nogreen = cat(3, redChannel, redChannel, blueChannel); noblue = cat(3, redChannel, greenChannel, redChannel); % to here orf = colorfilter(app,dimage,[320 50]); % red ogf = colorfilter(app, dimage,[50 170]); % green obf = colorfilter(app, dimage,[170 305]); % blue % Output % imshow(dimage, 'parent', app.UIAxes1_1); imshow(sharpened, 'parent', app.UIAxes1_2); imshow(equalized, 'parent', app.UIAxes1_3); imshow(nored, 'parent', app.UIAxes1_4); imshow(nogreen, 'parent', app.UIAxes1_5); imshow(noblue, 'parent', app.UIAxes1_6); imshow(orf, [], 'parent', app.UIAxes1_7); imshow(ogf, [], 'parent', app.UIAxes1_8); imshow(obf, [], 'parent', app.UIAxes1_9); end % Button pushed function: UploadimageforGaussianButton function UploadimageforGaussianButtonPushed(app, event) global filename; global filepath; [filename, filepath] = uigetfile({'*.png; *.bmp; *.jpg','supported imgaes';... '*.png', 'Portable Network Graphics(*.png)';... '*.bmp', 'Bitmap (*.bmp)';... '*.jpg', 'JPEG(*.jpg)';... '*.*','All files(*.*)'}, filepath); % Diverse Gpu image filtering by ÀÌâ¹Î, Á¤¿ø¿µ for matlab project% % Use gpu % image = gpuarray(imread([filepath, filename])); dimage = im2double(image); % Gaussian + filtering % grayed = mat2gray(image3); gau = imnoise(grayed, 'gaussian', 0,0.025); filtered = medfilt2(gau); adjim = imadjust(dimage); %Adjust non colored photo% % Output % imshow(imresize(dimage3,1),'parent', app.UIAxes2_1); imshow(imresize(adjim,1),'parent', app.UIAxes2_2); imshow(imresize(filtered,1),'parent', app.UIAxes2_3); end % Button pushed function: UploadimageforEnhancementButton function UploadimageforEnhancementButtonPushed(app, event) global filename; global filepath; [filename, filepath] = uigetfile({'*.png; *.bmp; *.jpg','supported imgaes';... '*.png', 'Portable Network Graphics(*.png)';... '*.bmp', 'Bitmap (*.bmp)';... '*.jpg', 'JPEG(*.jpg)';... '*.*','All files(*.*)'}, filepath); original = imread(fullfile(filepath,filename)); %%%%%%%%%%%%%%%%%%%%%%%%%%%%%%%%%%%%%%%%%%%%%%%%%%%%%%%%%%%%%%%%%%%%%%% %image enhancement Model Load% load('trainedVDSR-Epoch-100-ScaleFactors-234.mat'); dimage = original; dimage = im2double(dimage); [rows,cols,np] = size(dimage); %RGB이미지 색체, 휘도 분리 ycbcr_image = rgb2ycbcr(dimage); y = ycbcr_image(:,:,1);% 휘도 cb = ycbcr_image(:,:,2);% 색채 cr = ycbcr_image(:,:,3);% 색채 %삼차보간법을 거친 휘도,색채 bicubiced_y = imresize(y,[rows cols],'bicubic'); % bicubiced 휘도 bicubiced_cb = imresize(cb,[rows cols],'bicubic'); % bicubiced 색채 bicubiced_cr = imresize(cr,[rows cols],'bicubic'); % bicubiced 색채 %휘도 이미지로 학습된 딥러닝 알고리즘 dimage = activations(net,bicubiced_y,41); dimage = double(dimage); %이미지를 다시 RGB이미지로 Super_Resolution = bicubiced_y + dimage; vdsr_image = ycbcr2rgb(cat(3,Super_Resolution,bicubiced_cb,bicubiced_cr)); imshow(original,'parent', app.UIAxes3_1) imshow(vdsr_image,'parent', app.UIAxes3_2) %%%%%%%%%%%%%%%%%%%%%%%%%%%%%%%%%%%%%%%%%%%%%%%%%%%%%%%%%%%%%%%%%%%%%%% end end % Component initialization methods (Access = private) % Create UIFigure and components function createComponents(app) % Create UIFigure and hide until all components are created app.UIFigure = uifigure('Visible', 'off'); app.UIFigure.Position = [100 100 506 674]; app.UIFigure.Name = 'MATLAB App'; % Create UploadimageforColorfilterButton app.UploadimageforColorfilterButton = uibutton(app.UIFigure, 'push'); app.UploadimageforColorfilterButton.ButtonPushedFcn = createCallbackFcn(app, @UploadimageforColorfilterButtonPushed, true); app.UploadimageforColorfilterButton.Position = [14 641 163 25]; app.UploadimageforColorfilterButton.Text = 'Upload image for Color filter'; % Create UploadimageforGaussianButton app.UploadimageforGaussianButton = uibutton(app.UIFigure, 'push'); app.UploadimageforGaussianButton.ButtonPushedFcn = createCallbackFcn(app, @UploadimageforGaussianButtonPushed, true); app.UploadimageforGaussianButton.Position = [14 284 164 22]; app.UploadimageforGaussianButton.Text = 'Upload image for Gaussian '; % Create UploadimageforEnhancementButton app.UploadimageforEnhancementButton = uibutton(app.UIFigure, 'push'); app.UploadimageforEnhancementButton.ButtonPushedFcn = createCallbackFcn(app, @UploadimageforEnhancementButtonPushed, true); app.UploadimageforEnhancementButton.Position = [16 135 182 22]; app.UploadimageforEnhancementButton.Text = 'Upload image for Enhancement'; % Create Label app.Label = uilabel(app.UIFigure); app.Label.Position = [-68 273 1 5]; % Create UIAxes1_1 app.UIAxes1_1 = uiaxes(app.UIFigure); title(app.UIAxes1_1, '¿øº»') app.UIAxes1_1.Position = [12 529 133 113]; % Create UIAxes1_2 app.UIAxes1_2 = uiaxes(app.UIFigure); title(app.UIAxes1_2, 'sharpened ') app.UIAxes1_2.Position = [176 529 133 113]; % Create UIAxes1_3 app.UIAxes1_3 = uiaxes(app.UIFigure); title(app.UIAxes1_3, 'Equalized') app.UIAxes1_3.Position = [353 529 133 113]; % Create UIAxes1_4 app.UIAxes1_4 = uiaxes(app.UIFigure); title(app.UIAxes1_4, 'red to green') app.UIAxes1_4.Position = [12 417 133 113]; % Create UIAxes1_5 app.UIAxes1_5 = uiaxes(app.UIFigure); title(app.UIAxes1_5, 'green to red') app.UIAxes1_5.Position = [176 417 133 113]; % Create UIAxes1_6 app.UIAxes1_6 = uiaxes(app.UIFigure); title(app.UIAxes1_6, 'blue to red') app.UIAxes1_6.Position = [353 417 133 113]; % Create UIAxes1_7 app.UIAxes1_7 = uiaxes(app.UIFigure); title(app.UIAxes1_7, '(filter)only red') app.UIAxes1_7.Position = [16 305 133 113]; % Create UIAxes1_8 app.UIAxes1_8 = uiaxes(app.UIFigure); title(app.UIAxes1_8, '(filter)only green') app.UIAxes1_8.Position = [176 305 133 113]; % Create UIAxes1_9 app.UIAxes1_9 = uiaxes(app.UIFigure); title(app.UIAxes1_9, '(filter)only blue') app.UIAxes1_9.Position = [353 305 133 113]; % Create UIAxes2_1 app.UIAxes2_1 = uiaxes(app.UIFigure); title(app.UIAxes2_1, '¿øº»') app.UIAxes2_1.Position = [12 156 133 113]; % Create UIAxes2_2 app.UIAxes2_2 = uiaxes(app.UIFigure); title(app.UIAxes2_2, 'Adjusted') app.UIAxes2_2.Position = [177 156 133 113]; % Create UIAxes2_3 app.UIAxes2_3 = uiaxes(app.UIFigure); title(app.UIAxes2_3, 'Gaussian + filtering') app.UIAxes2_3.Position = [353 156 133 113]; % Create UIAxes3_1 app.UIAxes3_1 = uiaxes(app.UIFigure); title(app.UIAxes3_1, '¿øº»') app.UIAxes3_1.Position = [29 11 133 113]; % Create UIAxes3_2 app.UIAxes3_2 = uiaxes(app.UIFigure); title(app.UIAxes3_2, 'Deep learning Enhancement') app.UIAxes3_2.Position = [197 11 133 113]; % Show the figure after all components are created app.UIFigure.Visible = 'on'; end end % App creation and deletion methods (Access = public) % Construct app function app = app3_exported % Create UIFigure and components createComponents(app) % Register the app with App Designer registerApp(app, app.UIFigure) if nargout == 0 clear app end end % Code that executes before app deletion function delete(app) % Delete UIFigure when app is deleted delete(app.UIFigure) end end end |
'공부 > 기타' 카테고리의 다른 글
| 스마트홈 프로젝트 (0) | 2022.04.26 |
|---|---|
| 웹 애플리케이션 기본지식 (0) | 2021.05.20 |
| Block 암호의 운영모드 중에서 CBC 방식에 나타나는 “오류의 파급” (0) | 2021.05.09 |
| 대칭키로 평문 암,복호화 (대칭키 외부 저장) (0) | 2021.05.09 |
| 네이밍 컨벤션 (0) | 2021.05.02 |
아상관없어